Best 7 Yoga Poses for a Strong Core
“‘The core’ isn’t just the ‘six-pack’ muscles — the rectus abdominis.” But your core is actually a complicated corset of muscles that edge around your torso, including the front, sides and back, the hips and deep stabilizing muscles. A strong core is ground zero for nearly all of the movements you do, in your practice and everyday life.
In yoga, the core is sometimes called your source of gravity or power center. And, when this area is compromised, you may have trouble with balance, suffer from low back pain or not even be able to move well from pose to pose. On the contrary, a strong core is great for posture, stability and preventing injury to your back.
If you want to develop real, useful strength, there are few better options than yoga. These seven core-work poses reach deep into the abdominals and back muscles to build a powerhouse midsection.
Check out our Yoga Teacher Training in India
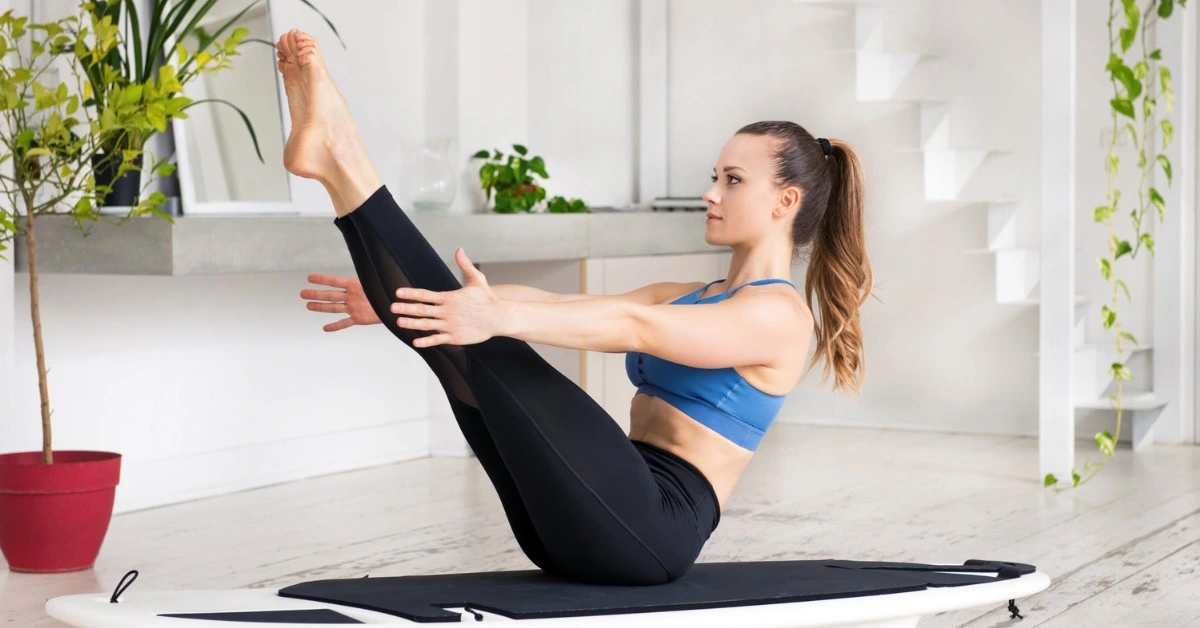
1. Boat Pose (Navasana)
Boat Pose is the ultimate yoga core strengthener. It requires concentration and stamina, while working the hip flexors and abs at the same time.
How to Do It
Begin seated with knees bent and feet flat on the floor. Lean back a little, and use your core to sit up tall with a straight spine. Lift your feet from the floor until your shins are parallel to the mat. Press your arms forwards down along with your legs. For the full expression, extend legs straight and bring body into a V-shape.
Benefits:
- It works the rectus abdominis and hip flexors.
- Improves balance and digestion.
- Stimulates the kidneys and intestines.
Tip: Keep your chest up and do not round your lower back. Place feet lower (if you feel strain on your lower back); squeeze glutes.
Modification:
Keep your knees bent and hands behind backs of thighs for support.
2. Plank Pose (Phalakasana)
You can’t discuss core strength without bringing up Plank Pose. It’s a full-body stabilizer that trains you to marry your upper and lower body with a stable core.
How to Do It
Start on all fours. Walk your feet back one at a time, straightening your legs as you do so. Your shoulders should be directly above your wrists. Activate your quads and press your heels back. Pull your navel toward your spine to avoid opening up hips
Benefits
- Tones the entire abdominal wall.
- Strengthens wrists, arms, and shoulders.
- Builds mental endurance.
Tip: Imagine a straight line of energy running from the crown of your head to your heels. Don’t let your head drop; keep your gaze slightly forward.
Modification:
Lower your knees to the mat while maintaining the straight line from knees to head.
3. Side Plank (Vasisthasana)
Plank works the front body, while Side Plank hits the obliques — those muscles on the sides of your waist that are essential for rotation as well as stability.
How to Do It
From Plank, press into the right hand and the small toe edge of your right foot. Place your left foot stacked on the right. Extend your left arm to the ceiling. Lift your hips high off the floor. Repeat on the other side.
Benefits
- Builds strength in the obliques, arms and wrist.
- Improves balance and concentration.
- Wrist and hamstring stretch (in advanced forms).
Tip: Root down through the base hand to rise up away from the shoulder joint rather than collapsing.
Modification:
Drop your bottom knee to the mat for more stability, or shift your feet rather than stacking them.
4. Chair Pose (Utkatasana)
It seems as if Chair Pose would shape the legs, but when you are holding this pose properly, your core engages sharply to protect your lower back while simultaneously lengthening and lifting through the chest.
How to Do It
Feet together or hip-width apart. Breathe in, reaching your arms up. Exhale and bend both knees, lowering your hips back and down as though sitting in an imaginary chair. Your weight is back in your heels.
Benefits
- Tones the lower back and transverse abdominis.
- Strengthens the thigh, ankle and calf muscles.
- Stimulates the heart and diaphragm.
Tip: Draw the tailbone in toward your back to lengthen the lower back while remaining in a neutral spine position.
Modification:
Bring hands in prayer at your heart center if keeping arms over head produces shoulder tension.
5. Forearm Plank (Dolphin Plank)
Forearm Plank can be even more intense for the abs than a standard plank, because it removes the triceps from the equation and forces the core to work harder. A standard see-and-do pose taught in many yoga teacher training, since it is effective for building the stability necessary for inversions such as Sirsasana.
How to Do It
Begin on all fours. Lower forearms to floor, elbows in line with shoulders. Either interlock your fingers, or keep the palms flat. Step your feet backward to straighten the legs. Engage your glutes and core.
Benefits
- Deeply targets the transverse abdominis.
- Builds shoulder and upper back strength without wrist strain.
- Opens the body for arm balances.
Tip: Keep drawing your forearms down and slightly away to widen your upper back.
Modification:
Just like in the plank position, you can drop your knees to the mat and keep your core engaged.
6. Three-Legged Dog (Eka Pada Adho Mukha Svanasana)
This variation of Downward Facing Dog challenges your stability. Lifting one leg forces the deep stabilizing muscles of the core to fire to keep your hips level.
How to Do It
Start in Downward Facing Dog. Inhale and lift your right leg up and back toward the ceiling. Keep your hips squared to the floor—don’t let the right hip open up. Press equally into both hands.
Benefits
- Strengthens the lower back and abdominals.
- Stretches the hamstrings and hip flexors.
- Calms the nervous system.
Tip: Flex the foot of the lifted leg and point the toes toward the floor to help keep the hips squared.
Modification:
Don’t lift the leg as high. Focus on stability rather than height.
7. Scale Pose (Tolasana)
This next seated balance is advanced and it takes a good deal of core compression strength to perform. It’s not easy, but the practice is still firing up your midsection.
How to Do It
Sit on the ground cross legged (traditionally, but simple cross works also if that is easy for you). Your hands should be on the floor next to your hips. with an exhalation contract your pelvic floor (mula bandha) and belly muscles (uddiyana bandha), press firmly into the hands, sending the hips and legs up away from the floor.
Benefits
- Builds explosive core strength.
- Strengthens wrists and arms.
- Increases body awareness and control.
Tip: Lean forward one or two degrees as you push down on your feet to help counterbalance the weight of your legs and glutes.
Modification:
Keep your feet on the floor, lifting only your hips. Or place yoga blocks under your hands for additional lift.
Deepening Your Practice
Strong core requires time, practise and patience to build. If you practice these seven poses several times a week, you will see improvement in the stability and posture of your body. And remember — core strength isn’t just for vanity, it’s about supporting and acting as the prime vessel for the things you want to do in your life.
If you’re curious about the anatomy of movement and want to find out more on how these muscles work together, there are educational opportunities. A comprehensive 200 hour yoga teacher training course will enable you to learn the anatomy and technique of these poses and teach them safely.
Start where you are today. Unroll your mat, grounded into the breath, and get ready to build our foundation of strength.